Tag Archive | tops

#SewAprilBlouse24

I got swept up into another monthly instagram challenge, #SewAprilBlouse24

It’s run by Gabrielle of Cloth Edit and Ruan of The Yorkshire Sewgirl every year. It’s not a complicated challenge.  Basically: You make a Blouse, in April, and post it on Instagram, tagging in Gabrielle and Ruan.

Blouse #1 

My immediate plan was to resurrect a project I’d abandoned about three years ago. Back when I was a blogger for Simple Sew patterns, I opted to work on their Lottie Blouse pattern. 

I’d link to it, but they don’t sell it any more

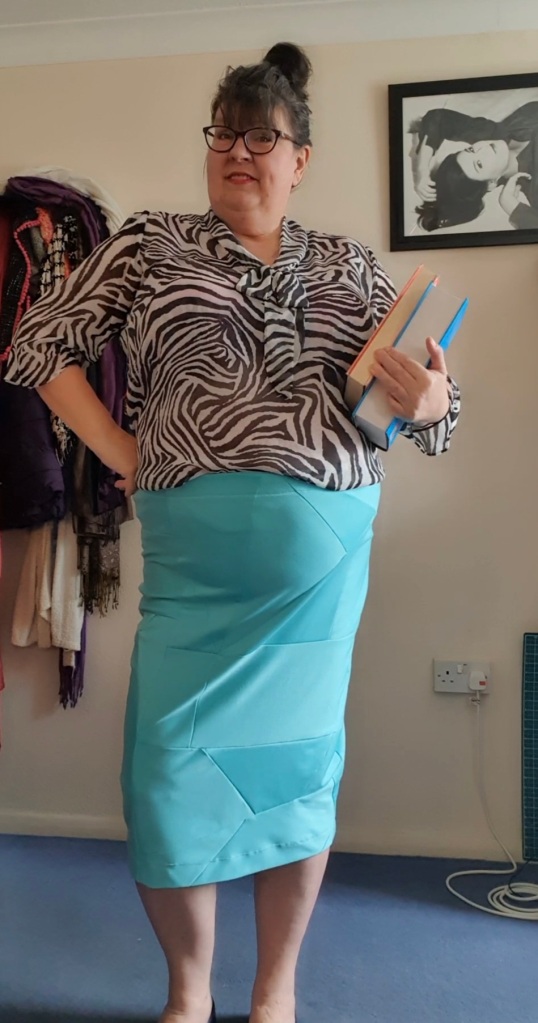
I did a load of grading to make their basic, only-goes-up-to-size-18 pattern get nearer to fitting me. I did an FBA. I took a whole load of In Progress photos, for the purposes of blogging my process for them. But I didn’t hear anything from the person who was supposed to be running the blog, and it eventually became obvious that she was taking it in a different direction. So I put the pattern away and after a while, I deleted all the photos. I’d intended to make the blouse up in this zebra print crinkle georgette from my stash (I think I originally bought it for dance costuming purposes), and it was still there all this time later. It was clearly this fabric’s destiny.

It’s a bit see-through!

I made the blouse up with the pattern as it was, hoping it would work as a wearable toile. The construction order is quite straightforward – sew the bust darts, then the shoulder seams. While the body is still flat, add bias binding to the keyhole neckline to neaten it, in case it shows from under the bow. Then gather the sleeve heads, insert the sleeves flat and then sew the side seams. Make the (long) neck tie, by sewing the tie ends, leaving a gap for the bit that’s going to encase the neckline of the body. Stitch the neck tie onto the body and then hem the sleeves and bottom of the blouse. Boom. That was always the thing about Simple Sew patterns, they are simple to sew.

Happily it is perfectly wearable, and you saw it in my Minty Ponte Matchy Patchy Skirt post.

The Librarian Look

Blouse #2

The Zebra version showed me that the pattern still needed some tweaking, to get the bust dart just right and to give a smidge more ease at the hips. This is what the front piece looks like now!

I also wanted to fancy up the sleeves because they’re a bit boring. So I did all the necessary adjustments, and then I set to hacking the sleeve pattern.

I wanted more fullness, so it was time to play with slashing and spreading again! I used 5 slash lines, cut them (and they went VERY curly!) taped them down over another piece of paper, adding 5cm extra at each line & hoped that would be enough. I added a bit of extra length at the back end of the sleeve, to allow for the bend of the elbow. And I made the whole thing a bit longer than the original sleeve.

I considered what fabric I wanted to use for my second blouse. I eventually settled on this navy and pink floral viscose, originally from the Textile Centre (I think), when they had a shop in Walthamstow. It was good and wide, and I had plenty to work with.

For the cuffs. I measured what size I wanted them to be and simply cut rectangles to twice those dimensions (to allow for the fold over) plus seam allowance. I also wanted to change the neck tie from being all wide and floppy, to being narrow, so I cut a 5cm strip, which again is a 1.5cm width strip plus seam allowances. It’s about 1.3m long, and again, I hoped that would be about right.

The only significant difference to the construction was that once the sleeves had been added and the side seams sewn, I gathered the lower edge of the sleeves and added the cuffs. I treated the narrow neck tie like a visible bias binding finish (though I’d cut the binding on the grain, not the bias) and where the extra length extended, I topstitched them together rather than faffing about with trying to turn and iron thin strips of fabric.

And since I had a load of fabric left over, I made a matchy matchy skirt. It is the easiest skirt in the world – I cut two rectangles a bit wider than my hips, and a bit longer than I wanted the skirt to be. I tapered the sides in a bit towards my knees. 

I sewed the sides, added an elastic waistband and hemmed it. Job’s a good’un.

So now I can wear my blouse and skirt as a fake dress. In fact I wore them to my niece’s confirmation a couple of days after I finished them.

The blouse & skirt combo – I really like the sleeves!

Blouse #3

It was getting close to the end of April. Could I manage one more of these blouses? There was only one way to find out. I pulled out a rather lovely blue linen I’d bought last year. I figured I had this pattern sussed by now, and I was happy to try it with the good stuff.

So pretty!

I got it all cut out. I was using the same plan as for Blouse #2 – a skinny neck tie, rather than a big fat one, and bouffy sleeves with a cuff. I changed the proportions slightly to account for the length of fabric I had available, so the sleeves are a bit shorter, and the cuffs wider. 

Dear Reader, I cannot tell a lie, I couldn’t manage it. Sensible Béa told me that there was no point in ruining this lovely make by rushing it… So I completed this one in May rather than April, but clearly it is still very much a Sew April Blouse, at heart.

The linen was an absolute joy to sew with. I got it from Lamazi Fabrics last year, and I can’t recommend their fabrics highly enough. They are so beautiful. If I wasn’t on a buying ban, I’d be shopping there all the time! 

Trying out that silly half-in-half-out tuck. Makes me feel like an idiot. I’ll stick with all-in or all-out in future

This has turned into being a really useful base for future blouse endeavours. I think it’s still got more hacking potential, so I’m really glad that I tried it out.

Big Red Buttons – a make from last year

This was supposed to be a dress.

Remember that Fabric Swap I went to a while ago, and came back with four fab fabrics? (Nope, I didn’t think you would, it was a long time ago!) One of them was a lovely navy sweater knit.

The label on it said it was 140cm wide and 180cm long. I thought that I could just about squeeze a knit dress from it. However, as I found out when I started to look at how to cut it, it turned out to be only 120cm wide, which made it much too narrow to cut the front and back side by side, so it was definitely not big enough to make a dress.

So I revised my plans, and went for a cardigan instead.

That meant cutting my front as two pieces instead of on the fold, and extending enough on the centre front to create self-facing button/buttonhole bands. I wanted wide bands, so I added 11.5cm, to create a 5cm band on each side and include a seam allowance. I wanted the neckline to be a turtle-neck, or thereabouts, so I raised it on the front pattern piece. I waited until I’d sewn the shell together, to check how it would fit, before finalising the collar cutting. The sewing up was easy enough, and the collar all worked out fine. 

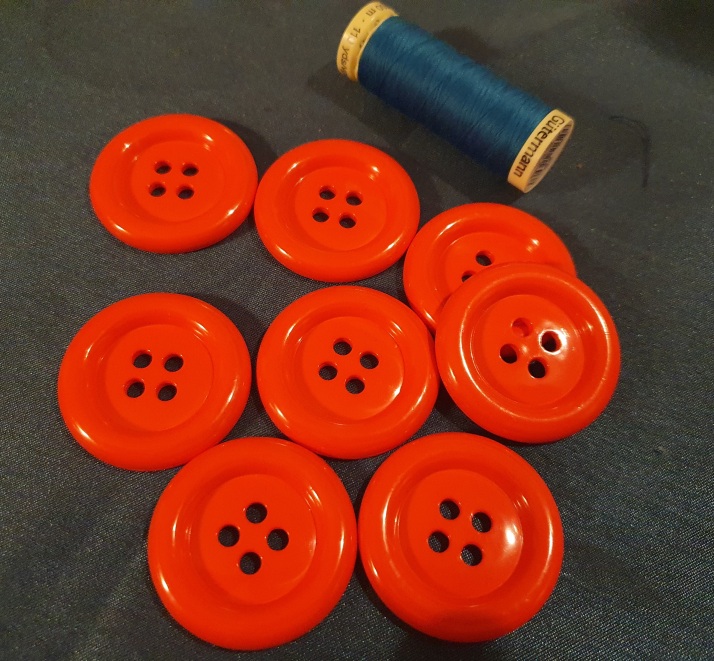
I had decided quite early on in my process that the buttons would be big red ones. Maybe white or navy would have been a more sensible choice, but the idea of red buttons was much more joyous! So I got these “clown” buttons from Ebay.

“Clown Buttons” – they’re not kidding! Bobbin of thread included for size comparison

My next decision was whether to make this a fully functioning cardigan, that opens at the front, or a fake cardigan which will always remain closed, and where the buttons are purely for show. I came down on the side of Fake, because then I’d never have to worry about gape-age. So I sewed the buttons on, then stitched both sides of the button/buttonhole bands together. Yes, in that order, so that the stitches from sewing on the buttons won’t show. So it’s a cardi-sham.

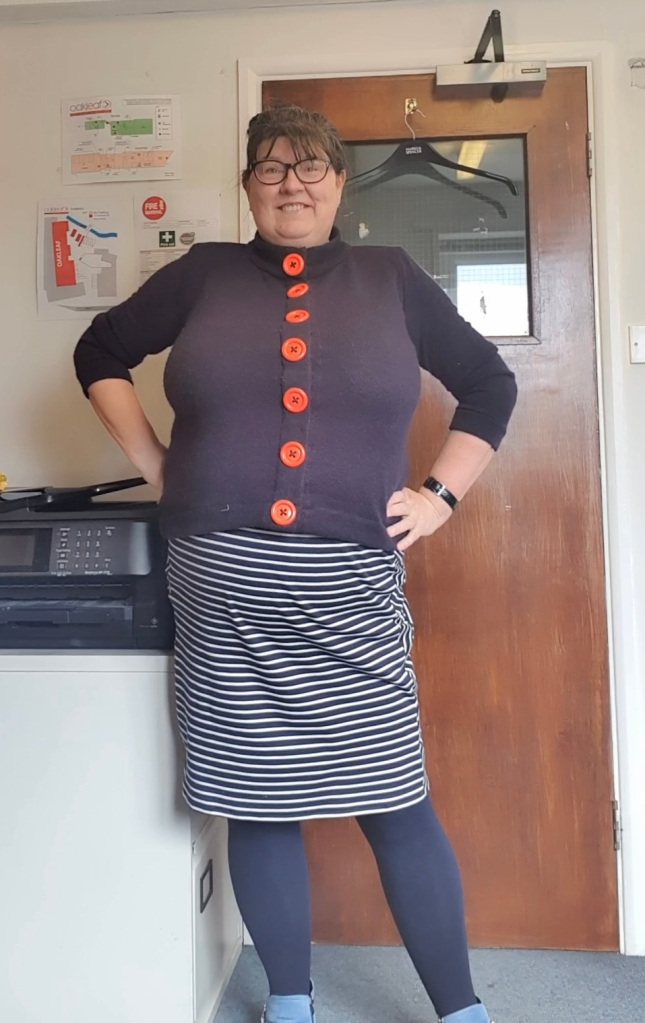
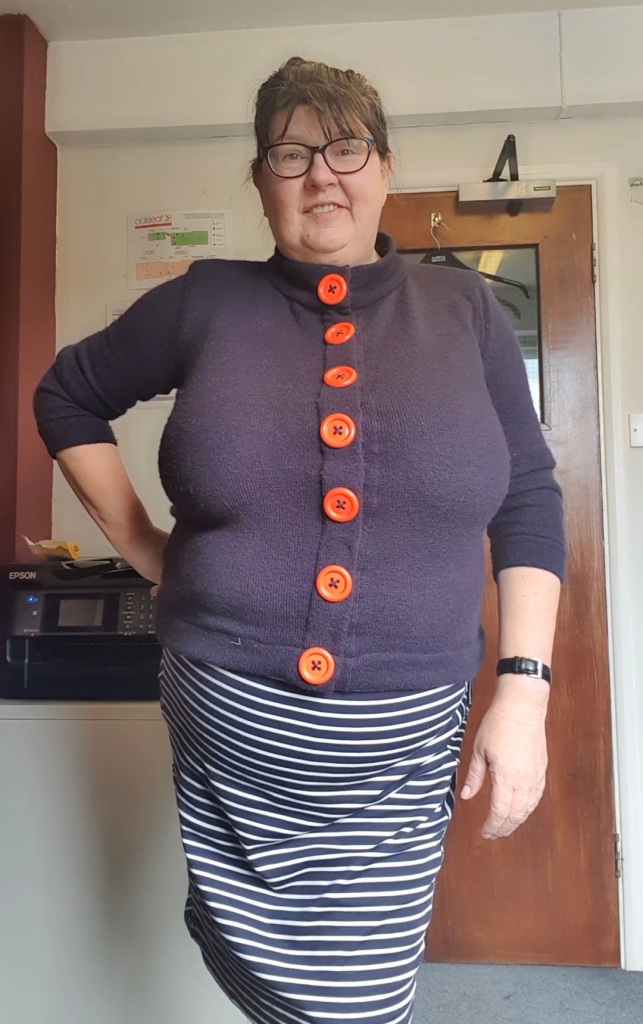
And it all came out as well as I could have imagined. I’m always amazed at how I’m able to take something as intangible as an idea in my head, and turn it into something real and wearable. It really is a kind of magic!

It’s an office selfie, because no-one else is in, I’m wearing it today, and it reminded me I needed to get this posted!
The cardigan goes really well with the Eyewatering Scrappy Skirt

Big Stripy Jumper

This jumper is very much a product of Instagram Sewjo. I got the fabric at a #SurreySews fabric swap, a couple of weekends back. And it was made largely at a @VirtualSewingRoom Sewing day.

Firstly, the fabric. This is a Sweater knit, cottony, quite loose and a tiny bit see-through. There were a couple of pieces of this fabric available at the Swap, but I had a really clear idea of what this was going to become, and I knew I’d only need this one piece.

The Fabric Swap was great. Enough people attended for there to be a good choice of fabrics, several long tables-worth, plus there were patterns and notions too. The organisers, Yvette (of Stash Hub) and Melanie, had put on teas and coffees and yummy home-baked cakes (big thanks to Mel!), and there were a couple of tables to sit and drink your beverage, eat your cake and fondle your new fabric. I was strict with myself, and stuck to a One In, One Out policy, so I took 4 pieces along and came away with these 4 – the stripy knit that I was using for this make, a navy sweater knit, a beautifully soft jersey the colour of purple crocuses and a blue zebra print jersey. I have plans for each of these!

The inspiration for this make had come from the Sew Different Layer Dress and Top, specifically the top.

I had been intending to make a top like this for a while. I could see that it was a simple enough pattern to draft myself. In the event, I didn’t even commit it to paper, I just cut straight into the fabric. Cause it’s that simple.

I was making this on a Virtual Sewing Room sewing day. The Virtual Sewing Room is a lovely project created by Jenny. It’s pretty much what it says on the tin – it’s a Zoom meeting where everybody can be at home sewing, crafting, knitting, whatever, together. There are 2 evening meetings per month and occasional Weekend Days, and there’ll be more next year. And its free!!! (though I usually make a little donation to contribute to costs). I’ve found it helps me to be quite focused about my sewing, and I’ve made some delightful new sewing friends from all over the country. Anyway, Jenny had organised a Saturday event and I used the morning session to do my workings out for this top and cut it out, and to do the same for a cardigan in the new navy knit fabric, and the afternoon session to overlock All. The. Edges. Because I figured I didn’t want either of those two project pieces to fray or unravel.

When I unfolded the stripy fabric to cut it, I was a bit disappointed to find it had a hole in it. But it was in a spot that I thought I could cut around it so I wasn’t too worried about it. Then I found a second hole that I couldn’t avoid, but thankfully it was small enough that I could patch it. I’ve made that the back piece, just in case anyone notices it, but I won’t mind if they do.

Though I say so myself, pretty nifty!

Structurally this jumper was a piece of cake to construct. There are two big squares for the body, and two small rectangles for the sleeves.  I sloped the shoulders a little and tapered the sleeves, and I cut a lower front neck line. I wanted the sleeves to be nice and snug, compared to the billowy-ness of the body.

Having sewn the shoulder seams and added the sleeve pieces to sew them in flat, I pinned the side seams and tried it on to see whether I needed to to make any adjustments. I tightened up the sleeves a bit, but I was otherwise happy with the construction. I sewed the side seams, paying careful attention to my stripe-matching, having pinned carefully on each of the stripe edges.

I don’t know why I’m looking grumpy, that’s some pretty good stripe-matching there

Then I decided to re-overlock the sleeves, because I had taken them in quite a lot.

And that’s when I broke my overlocker. Which was unfortunate. I had to finish the sleeve seams with a sewing machine zigzag instead. I’m hoping that the sewing machine centre down the road can fix it.

I sewed the hem and cuff hems with a small turn under. But for the neckline hemming, I added a narrow (5mm) strip of interfacing before doing the turn under, to stabilise it. I decided I liked that so much, I redid the hem that way…

I am so happy with this jumper! It’s probably a bit too cold right now to wear it on its own. It would need to be layered with a camisole or tee underneath. It’s definitely meeting my vision of what I wanted to make, which was a slouchy top that would be comfortable to wear, but smart-looking enough for work/going out.

A Slightly Goth Nightshirt

I made a very easy shirt a long time ago, at a Sew Over It Workshop, back in the day when they did face to face workshops. I had asked for them to grade up the pattern (the Alex Shirt/Shirtdress, from their City Break E-book), because I was bigger than the maximum size they did then. They’re much more size inclusive now. At the time, I had my doubts about what sort of a grading job the teacher did. The shirt was oversized, and despite her assurances that the shoulders were meant to be that far down my biceps, and the chest was meant to be that wide, I was not convinced.

The original shirt

I decided to use it as a nightshirt rather than a going out garment, and it works very well that way. Over time, the fabric has softened and become more drapy, and the dodgy fit has become less of an issue. In fact it’s enough of a beloved item for me to justify doing a load of mending on it, when it’s got worn.

Very Visible Mending

Since I made it, I wondered if it had just been a case of me choosing the wrong sort of fabric. I decided to try making it again, but in a more drapy material, to see if that made the sizing/fit issues any better. I finally got around to trying this theory out, because I wanted a new nightshirt.

I picked a more fluid viscose fabric (from Fabricland, but it’s no longer in stock). They called it Caribbean Hibiscus, but I’ve always called it Midnight Garden, because it’s a floral print on a dark navy background. It’s drapy, but still quite substantial, you can’t see through it.

She’s pretty!

I made the pattern up, exactly as per my original pattern from the workshop. The only difference was that I shortened the sleeves.

I should have learned from the original version that I don’t actually use the buttons, I just pull the shirt on over my head, so I don’t know why I went to the trouble of making buttonholes, with all the “Will they all work out ok, or will the last one bugger up the whole thing” stress. But I did. And they did all work out ok.

Here it is

I like the feel of this nightshirt – it’s soft and tactile. I like the goth vibe of the print. But it’s proved to me that I was right about the grading job. I still think it’s too wide. The pattern, as designed, doesn’t include any sort of shaping, but for a curvy girl it definitely needs some. It’s not falling right, it’s swinging out, and the side seam pulls forward at the bottom. And the hem is rising at the front, on account of my bust projection.

Side view

My thinking is that it needs some bust darts plus an FBA, to provide all the fabric it needs in the top front centre, and less at the sides. That way the front would fall straight down rather than flaring forwards.

Armscyes are very low

The armscye is very low down the torso, but I suspect it would work better if the shoulders weren’t so wide.

But overall it’s cute and I’m ok with it for a nightshirt.

It’s all ok, I’m happy with it

If I want to make an actual shirt or shirt-dress from this pattern, one that I’d be going out of the house in, it would need a lot of adjusting and re-toile-ing. I’ve looked at the pictures on the SOI website, and searched the hashtags on instagram for other people who have made the Alex, and I can see that this shirt was not designed as loose-fitting, boxy or baggy. It’s quite close fitting. It feels like the teacher who graded this pattern for me basically just made everything bigger all round, and she definitely overdid it on the Wearing Ease (the amount of extra width in the garment that allows it to be not too tight, not too loose, according to the style of fit you want for your garment).

Which leads me back to the subject of the pattern grading…  I still feel a bit aggrieved (can you tell?) at the lazy grading job that the teacher did (that I paid extra for, by the way, it wasn’t on the house!) and the failure to adjust on the hoof, during the workshop. I had intended to go off on a big rant about it. But, pfft, it’s a long time ago, and a lot of water has passed under the bridge. I really shouldn’t hold onto those negative feelings. So I’m going to try and rationalise it, and turn it into a positive.  I WILL amend this pattern to get it back to something I’d be happy to wear, and I WILL make this pattern again as an actual going-out-of-the-house shirt. This is going to teach me more about Proportion, in terms of the visuals, and in terms of construction. So I’ll be spending a little while with rulers, bits of paper and sellotape. Wish me luck!

Finally, I should also say, I am fully aware that SOI have extended their size range enormously since 2017, and I am very grateful for that, and to every pattern company that goes beyond a size 18. So this is not about them, but about the issues inherent in grading patterns up in size. I know I’m always going to need some tweaks, to make the pattern just right for my body, but it’s so much easier if the basic pattern is in the right sort of sizing for me in the first place, and it’s only a matter of tweaks, not reshaping the whole thing.

So watch this space. I’ll be coming back to this pattern. I’ve got another project I’m concentrating on right now, so it won’t be soon, but this is not goodbye, it’s definitely au revoir.

Top, top, dress, skirt… Bank Holiday Makes

Over the years, I’ve bought a fair few basic Primark stretchy tees, because they’re a useful wardrobe staple. I haven’t bought any in the last 5 or 6 years, mainly because I’ve got a largely me-made wardrobe now, and I don’t feel good about buying into fast fashion. I still wear my Primark tees, but I’ve been trying to find a good pattern for a similar close-fitting stretchy tee, so that I can make my own replacements as I need to – the ones I’ve got aren’t going to live forever! It’s not been easy, all the patterns I’ve seen/downloaded needed a lot of adjustment. In the end, I realised the easiest thing was to clone one of my originals. And the weekend before last (May Day Bank Holiday weekend), I gave it a go.

I already had a half tee that I’d cut the bottom off, in order to lengthen another one. So it was an easy job to carefully cut the remaining top half (which is the bit that is hardest to draft) apart and use it to create a pattern. It wasn’t a nice clean job, because I’d worn it hard, and it was quite stretched and warped out of shape. I had to adjust accordingly, but by the end of the Sunday evening, I had a pattern that I could test out. I wasted no time, and on the Bank Holiday Monday, I used some rather nice jersey from Pound Fabrics in a dusty lilac colour and created this first version of my Repro Tee. The jersey is really good quality, nice and firm, with good recovery, so it worked well for this kind of top. I think I’ll be getting more in different colours in due course.

Apologies – all these pictures are “on the hoof” Me Made May Instagram Stories photos, just documenting what I was wearing, so I’m not wearing makeup. I will do better in future…

Snug but definitely wearable

It was more or less as I’d hoped. It was a bit on the small side, but dammit, I’m still going to wear it! Also the sleeve head was a bit tall. Those were two easy adjustments to make.

Fast forward to this weekend, the Coronation Bank Holiday weekend… I spent the Saturday morning watching the Coronation and making the next iteration of the Repro Tee, using the left over pieces of jersey from making this Trapeze dress last summer. Because it was an A-line dress, there were enough biggish bits available to make the front and back pieces, though not big enough to do any clever pattern placement. However, I did remember, this time, that this print does have a direction, and managed to make the leaves sprout upwards rather than downwards, as nature intended.

The Coronation Top

I was now happy with this pattern and started working out what fabrics I’d got in stash that I could use to make more. It’s a quick make. The thing that takes longest is inserting the neckband. Especially as I keep messing them up!

Then I turned my attention to adding a skirt panel to make this top into a dress. The Front and Back pattern pieces are both essentially the same shape once they reach my waist & hips, so I created an add-on piece to make a dress length. I tried it out with this teal jersey I bought in France five years ago. Again I was making the same version of the top, just with longer sides, so it wasn’t any trickier.

I am SO happy with this pattern

This was actually the dress that I’d had in my head right from when I’d first bought the fabric, so this is a definite win.

Finally, the skirt extension that I’d drafted has a slight taper so it’s more of a pencil skirt than a straight one. I still had a metre of the dusty lilac jersey, and rather than make a second top in the same fabric, I decided to use this to make a skirt, so that if I want to, I can wear the top and skirt as a co-ord (hark at me, being all fashionable!). The fact that this is a fairly robust jersey really makes it work for a skirt.

Navy and lilac, the perfect colour pairing!

To be honest, I’m not sure I’ll wear them together, because it’s a bit pastel pale, and I like to have some stronger colour as contrast. But the navy stripy top and skirt from the last couple of posts and the lilac top and skirt are eminently inter-swappable (yes that’s a word), so I’m feeling quite happy about that.

I’ve got so many plans for this pattern, though I don’t imagine I’ll be maintaining this level of productivity. But watch this space!

Another Top

So I made the minty coloured top, a few weeks ago, trying out a jersey dress pattern. And I did actually make a second top a few days later, to try out the changes that I’d decided I needed to make. I made it in the striped navy ponte from Pound Fabrics, that I had left over from making the stripy Batwing dress earlier this year. It’s a nice warm fabric. I was happy to be using up leftover fabric, especially as the Batwing is very fabric hungry, and leaves big swathes of scraps, which isn’t very sustainable.

That top (this top) has been sitting here for weeks, waiting for me to wear it, so that I could photograph it and post the make here.

The trouble is, I wasn’t wearing it. It’s kind of a wardrobe orphan. It’s in navy striped ponte, left over from making this stripy Batwing dress. I have plenty of navy dresses, but no navy skirts. Not even any “goes with navy” skirts. At least not in my winter wardrobe. I’ve got plenty of black skirts that I will happily wear while it’s still chilly, but I was brought up to believe that you don’t wear black and navy together. There are a few of those childhood beliefs that I’ve managed to get over in my time, but not this one. Black with navy is a complete no-no for me. Everyone else can go ahead and enjoy it if they want to but I am silently judging them.

Finally, today, I decided this had gone on long enough. I was about to photograph a newly completed chunky jumper, and I thought, stuff it, I’ll put on one of the summer “goes with navy” skirts, and do the two sets of photos together. So at long last here is the second top made with the tweaked jersey dress pattern from Sewisfaction.

I reduced the FBA quite substantially, and narrowed the neckline, so that it’s close to my actual neck, and less boaty. I still want to tweak the pattern a little further, to move the bust dart down a bit, but I think that should be all it really needs. I’m pretty happy with this version.

What I need to work on, between now and probably October, is a Winter-wearable skirt in navy. So that this top doesn’t stay as a Wardrobe Orphan. I am making Plans…

In search of the perfect t-shirt style dress pattern

I did a workshop at Sewisfaction a while back. I do workshops for a lot of different reasons – sometimes it’s for a thing I particularly want to try making, or a skill that I want to work on with a teacher’s support, sometimes it’s because I want to kick-start my sew-jo, sometimes it’s because I want to give myself some focus time.

This time, I joined because I wanted to make the Beginners’ Jersey Dress. I’ve been trying to find the perfect jersey/ponte t-shirt style dress pattern. I’ve been using my much adapted Simple Sew Shannon dress, but I’m really after a dress with a more set-in sleeve, even if I’m setting it in flat. I was hoping this workshop would give me a pattern that I can reproduce a few more times. I have to say, I’m not quite there with it yet, but I’ve definitely moved a big step forward with it.

The workshop was fun, with people with a wide variety of experience, which Sheona (teaching the workshop) dealt with brilliantly. She organised it so that we all started together with measurements and pattern cutting, then regular demonstrations where we all came together, so even if we had diverged in how far along we were, we all knew what we were doing.

Of course, my dress fell into the upper size range and, having a bigger bust, required an FBA. So I learned how to do an FBA for knits when there’s no existing dart in the dress. Always a useful skill. Having Sheona as a fitting buddy, to spot what could be tweaked and to explain how, was excellent! One of the difficulties I always seem to have had with jersey dress patterns, is that they all seemed to have very gapey necklines, and Sheona was able to show me how I can adapt the pattern without tinkering with the shoulder line, which was working fine. So that’s another useful technique to be aware of.

We didn’t get all the finishing done in the workshop. So I did the top-stitching of the neckband at home, and tried the dress on. I’m not saying I hated it, but it just didn’t feel quite right. It was looser than I liked. I feel that the whole point of a jersey/ponte dress is that it conforms to your body, not that it flaps over it loosely. But that’s OK, because this was always going to be a toile, to see how this pattern worked. I was able to re-sew the sleeve seams to make them narrower , which helped it feel more “me”.

I was wondering what to do about the dress length. I’d cut the dress quite short in the workshop, because that’s how the pattern comes, and I knew this was just a toile. I’ve got some dresses that I prefer short, but this one didn’t feel right for me with so much looseness in the body, and at that length. So I chopped it into a top, and it’s looking a lot more the thing.

Getting there!

So I’ve moved a step further towards my perfect stretch t-shirt dress. I did all the FBA adjustments to the pattern directly, in the workshop, and now I need to reverse engineer it to make the adjustment smaller, to make the dress narrower, more snug.

More on this, as the changes get tried out…

The Hundreds and Thousands Sweater

I was thrilled to hear that the London Stitchers Meet-up was back up and running. I haven’t done anything sewcial in ages, and I couldn’t wait to see some sewing friends for reals.

So that’s how I found myself at Fabrics Galore in Lavender Hill a couple of weeks back. There were drinks and nibbles, but more to the point, there was fabric to fondle. I haven’t been fabric shopping in ages, because of trying to sew from stash and not add to it. But, oh my goodness, there were so many beautiful, tactile, luscious fabrics to choose from! I’m definitely going to go back there to shop, because there’s so much lovely stuff.

I ended up buying some sweatshirting, with a soft brushed back, speckled in multicolours. It looks like it’s been rolled in delicious sugary sprinkles. I can’t see this exact version on their website, but the grey version is here, maybe you need to visit the shop to see this cream version, or the peacock version, I think there was maybe a pink version too, but I can’t remember, and anyway, I felt like this was the prettiest.

The visuals don’t give you the feeling of how soft and cosy this is.

I was determined that this should get made up sooner rather than later, and shouldn’t languish in the stash for months/years. Right from the start, I’d visualised it as a sweater with a funnel neck. I got into my sewing groove this morning, while the Archers compilation was on, and it was finished a couple of hours later.

This is my go-to Shannon Collection adapted pattern. I lengthened my usual sleeves, for cosiness, and to make full use of the fabric length I had available. I also narrowed my sleeve pieces to the cuff, also for cosiness. I made a collar piece that would be 5cm tall (so it was 13cm, ie 2 x 5cm + 2 x 1.5cm seam allowance), and Bingo, I had a new top to wear to the cinema this afternoon.

You can just about see the speckles here
Exactly like the picture I had in my head

I’ve just had a very silly thought wandering through my head – now that this is very clearly my Hundreds and Thousands sweater, if anyone asks me about it, I can just say it’s a mere trifle! Boom boom!

A l’eau, c’est l’heure*

Or the “Are you a matelot?” top**

Having identified that stripes are fun, and nicely nautical, I decided to make a marinière top. Not a proper official French navy 21 white stripes version, but my own version of it. I was shopping online at Fabricland, and popped an extra metre of stripy jersey into the cart, for a bargainous £3.99. It arrived in double quick time (excellent service, thank you very much!).

I’ve decided I’ve made enough changes to the Shannon pattern to call this top mostly-self-drafted by now. There’s really only the side seams that remained untouched, as I’ve tinkered with both the sleeves and the neckline. I made a version to t-shirt length, with my favourite 3/4 length sleeves. I used my usual construction method: Sew the shoulder seams, then sew the sleeves in flat, then sew the side seams.

I tried it on, once it was put together, to see if there was anything I wanted to change about it. I decided it was a smidge too huggy around the hips, so I opened up the last 8cms of the side seams, to create a short side split. Oh boy, that was a job and a half! This jersey is quite a spongy fabric and the stitches sink into it. Plus my stitches were quite small. It took AGES to unpick neatly without making any holes in the fabric.

The other thing that trying it on revealed is that really I should be adding a curved bit to my front pattern piece. Here’s a picture of the side view:

Longer in the back than it is in the front

You can see how the bust pulls the fabric up at the front, It looks ok front on, but next time I’m going to add an extra 5cm at the centre fold, and curve it up to the outer edge.

I had done my best to stripe match while cutting the pattern pieces out, but I could tell that something had gone slightly wonky, around the neckline, and I haven’t been able to work out why. It’s a printed stripe, rather than a woven one, so maybe that’s something to do with it. But I wasn’t going to spend all evening trying to identify the problem and fix it, when it really wasn’t that much of a problem, and the whole point of this top was to make it quick.

I made a band to go on the inside of the neckline, to stabilise it and finish it nicely. But I did bog-standard turn-it-under-twice hems for the sleeves and lower edge. I did them by hand, on the train up to that there London to go to the V&A Bags exhibition. Very good exhibition, lots of beautiful handbags, including the design and making processes.

I was trying to do a Sailor’s Hornpipe, but realised, I didn’t know how a Sailor’s Hornpipe actually goes…

So that’s the story of this super-quick top, all ready for the summer. I highly doubt I’ll be able to go to the seaside in France this year as I normally would, so I might have to wear it for walks along the canal instead.

* The motto of the French Navy***.

** An extremely niche Steeleye Span/Peter Sellers reference.

*** No, of course not! It’s a Barry Cryer joke! Try saying it out loud.

The Go It Alone Christmas Jumper

My first ever Christmas Jumper

I like having something new for Christmas. I haven’t sewn much this year, because I haven’t really had any need for new clothes, with all of the working from home, and all the not meeting people. But once the nights start getting earlier, knitting becomes a good outlet for creativity and makery.

This jumper had its origins in April/May 2019. I started and damn near finished the Sewrella My First Holiday Sweater. It’s a fab jumper, but it’s very boxy, and the shape just wasn’t working for me. I put it in the pile of things to think about, and by summer this year, I’d come to accept that despite all that work, it was time to frog it, and use the yarn for something new that would be more flattering on me. I wanted to use the lovely colourwork again, but have something a bit more close-fitting. Whatever pattern I used, I knew I’d have to adapt to suit the colourwork repetitions. I decided to Go It Alone, and write my own pattern.

My last three jumpers (apart from the ill-fated First Holiday Sweater, have been based on the Jenifer Stark Nutmeg pattern which I’ve tinkered with each time, to suit what I was aiming for. (It’s no longer very recognisable as that original, but credit where it’s due). They have been knitted top down, and I have no idea why but I decided to go bottom up for this one, probably because the first thing I wanted to change was the ribbing at the hem. I did a sample square to check my tension, and used that to work out how many stitches and rows I would need to make the basic torso, how many increases I would need to make my sleeve widen as I knitted it up, how the yoke would join, and how much I’d need to decrease to get to the neck. You never realise as a child how much you will use Maths for fun.

I wasn’t making it up as I went along – I had a plan – but I did find that I adapted slightly as I knitted, and

Obviously, the most fun thing was working out the colourwork. I used the Sewrella pattern as my starting point, but I needed it to be a bit longer, and I needed to fit in a different decreasing pattern. If you’re that interested, I’ve put the chart, as well as all my construction details, on my Ravelry Project page.

I started this project at the end of November, and I’m thrilled that I’ve got it finished this quickly. I am literally going to be wearing it all week.

Merry Christmas!