Tag Archive | straight skirt

A Swishy Skirt

I bought some houndstooth check ponte just before Christmas, on a whim, with no particular make in mind, and waited for the Inspiration Fairy to sprinkle her magic dust.

I like a bold print

The Inspiration Fairy showed up in the guise of Bianca – The Closet Historian – and this Youtube video of hers on creating a side swishy taffeta skirt.

Isn’t this look spectacular?!

I’m nowhere near as stylish as Bianca is – I dress for comfort – but I loved the idea of a side swishy skirt. I wondered if I could adapt her approach for use with this ponte. I would be working with a stretch fabric rather than a woven, and I’m not an experienced or skilled pattern drafter (more of a bodger) but I figured I could take the basics from her more sophisticated design and turn them into something more everyday. I checked I would have enough fabric (I did), and set to…

Bianca had done the pattern-drafting properly, and was doing it all in one pattern piece, whereas I was winging it, and doing it in two pieces. I was adapting a tube skirt, by adding a circle to one side of it. Like this…

It’s basically adding one massive wing to a plain skirt

It’s not an exact copy – I don’t have much waist to hip flare, so if I put my swag as high as Bianca’s is, it would be highlighting how straight my hips are, so my swag starts lower down.

I did my best to pattern match. I cut one piece first, then pinned very carefully to try and get at least a horizontal match. It seemed more important to get the match on the non-swishy side, and (maybe to a lesser extent) on the top of the swishy side. The swag was going to break the pattern completely, so I wasn’t too worried about that bit.

Not too tricky

It was a straightforward case of sewing the side seams, then making a casing in the waistband for the elastic. That elastic that I couldn’t find when I was making the Good Enough For Jazz Pants. I knew if I bought some more elastic, the original that I’d lost would come to light. And of course that’s exactly what happened.

I didn’t want the elastic to get twisty so I did a zig-zag along the centre of it, stretching it out while sewing it, to maintain the stretch. That should hold it in place.

Waistband

As this is a relatively heavy fabric, I left the skirt to hang for a couple of days, before doing any hemming. I wanted to get the worst of the wobble out. After two days, I cut the hem so the swag would end up straight, and went on to do a small hem, so as not to add any more weight to the circle section. I also realised that the heaviness of the fabric would put some strain on the point where the swag starts, so I reinforced that corner with a bit of ribbon, just to make sure it would be ok.

And voila!

New Skirt!
A little bit of swish on show
A lot of swish on show

And if you want to see the swish in action, I posted a little reel on instagram.

It seems to have a Librarian vibe. I might think about making a Pussy Bow Blouse to complete the look!

Another Simple Sew Stylish Shell Top, plus a skirt

My post has gone live on the Simple Sew Blog now, so I can share these two makes:

Way too hot for these!

The top is another iteration of the Simple Sew Stylish Shell Top, made with a beautiful minty green chambray from Doughty’s Online (supplied by them specifically for the blog – Thank you so much!). I hacked a stand-up collar onto it. Go to the blog to see how.

The skirt is another of my self drafted straight skirts, which I narrowed to pencil proportions! I used a scuba fabric from Fabricland UK, which doesn’t seem to be available on their website now. I’ve still got a load of it left, which I don’t really know what to do with, to be honest. I love the print, and I wondered if I could make a matchy matchy  jacket with what’s left. But the fabric is really hot to wear, so I’m not convinced it would be a good idea!

Both these makes were conceived before the heatwave, and I have to say, I don’t have a lot of use for either of them right now – I think they’ll be much more welcome in the autumn.

Finishing off the Massive Paisley cotton

When I cut the Bonkers Zoë Dress, I had about 60 cms left over, and I decided that would be enough for a skirt. On Monday night I reached for my self-drafted straight skirt pattern, and sewed it up. This time, there was definitely no option for pattern matching, I was just happy that there wouldn’t be any big shapes with anatomically unfortunate placement. I even had enough of the weirdly shaped scraps to cut the facing pieces.

I decided I wanted to use one of the lacy zips I’d picked up at the Knitting & Stitching Show. I’d got one in navy, and although the navy in the paisley and the navy of the zip aren’t a perfect match, I was on a “use what you’ve got” kick and went ahead. It was going to be an exposed zip, so I read/watched a few tutorials, because I haven’t done one of these, and I worked out a method that looked manageable for me and was pretty enough.

Pretty lacy zip

I knew I was going to have a train journey up to London on Wednesday, so I decided to leave all the hand finishing until then. I knew I wanted to add a bias binding for the hem, because it would allow me to make as much use of the fabric length as possible. Also I really like the feeling of a satin binding when I’m not wearing tights. I overlocked the hem, and sewed on the binding, with the tiniest turn up I could get away with, all ready for the hand sewing. So Wednesday saw me hemming the skirt on the train, and neatening up the waistband by the zip.

Hem with bias binding

And today I was wearing it to work.

A fab new summer skirt!


Lookin’ good!

I did have a moment of panic last night, as I decided to try it on before going to bed. The zip stuck and then with all my faffing about with it the teeth split apart below the puller. The thought that I might have to cut myself out of it flashed through my mind! But then I got a grip and managed to ease myself out of it, and I was able to calmly coax the teeth back into their proper order. Phew!

Zip all A-OK

What would I do differently next time? Use fabric I can pattern-match more readily!

What do I love about this skirt? It’s going to be a useful Spring/Summer skirt. I love the lace zip, and I really want to use the rest of the ones I got now.

Making a Win out of a Fail

The Fail – adding to the stash

I fell off the stash wagon at the weekend. I was supposed to not buy any new fabric until I’d used at least 6 pieces from my existing stash. But there was a sale at FC Fabric Studio on Saturday. I’d only used three pieces, though I had cut out a fourth, without having done any sewing on it. Too bad – their prices are really good anyway, but when they are reduced, they’re brilliant. I couldn’t resist.

I went with a plan… I’ve got this new overlocker, and I need to practise using it. I decided to stick to jerseys, with the idea of making some leggings and t-shirts suitable for teaching dance in, because Me-Made May 2017 is coming up and I’ll have four teaching nights where I’ll need to clothe myself. And FC Fabrics have some beautiful jerseys.

I came away with over 8 metres of viscose jersey for only £10. Three of the pieces I found in the £2 remnants box, including a deep royal blue bit that turned out to be over 2½ metres – bargain! I thought I’d be going for their printed jerseys, but maybe because there weren’t so many of them on sale, or because the plains were just calling to me, it was all plains. They all have a bit of elastane, to make them stretchy enough for my dance-practice-wear purposes.

The colours are a bit off, but not too badly

However, I was conscious of my epic failure on the not-buying-new-fabric front.  I was already in deficit to the tune of 3 makes, and the stash has gone up by 4 bits.

The Win – using up the stash and firing up the sew-jo.

This fail galvanised me into action. I had four WIPs- patterns already cut out – and I could jollywell make some of them up, to start meeting that deficit. It helps that Saturday, apart from being Fabric-Buying day was also Me-Made-May-2017-Sign-Up-Going-Live day. As I have mentioned in my post, MMM is usually extremely good for my sew-jo. That, and an overwhelming stashguilt combined to make Sunday a day of sewing.

I sewed up the navy Juliette top that I’d cut out a couple of weeks earlier. I’d cut it before the black Juliette, to test my pattern adjustments, and I’d pinned it all together to test it. I’m not sure that even constitutes a toile! But it was still pinned, so it was good to go. Having made the black one so recently, the instructions were all still fresh in my mind. I didn’t include the waist ties, because I didn’t have enough fabric, so it was even easier/quicker. The longest process was the hand-hemming. I don’t really think there’s much else I can add. I’m impatient to post this and I haven’t photographed it yet, but it’ll feature in a post soon enough, I’m sure, and it’s certain to show up in MMM!

Oh except I sewed in a little charm, into the facing, so I’d know which is back and which is front. I got a load of these at the Knitting and Stitching Show last month.

Cute, eh?

And while I had the overlocker out, and threaded up with black thread, I pulled out a long-standing UFO, to see if I couldn’t have a stab at finishing it in time to wear to work on Monday (spoiler alert – I didn’t!). This was a straight skirt, using my self-drafted pattern. I’d cut it months ago, from 80cms of cotton sateen. The fabric was a tiny smidge too narrow to fit both front and back side by side, so I had to cut it rather more snugly than the pattern dictated, and I was relying on a slight stretch in the sateen and narrow seam allowances to make it work and still be able to sit down in it. This is what I had left:

I don’t like wasting material! 

I needed to cut the facings, and as there wasn’t enough of my main fabric left, I pillaged my scraps and used a bit of purple from the You Mean I’m Wearing Orange?! skirt. I used curved petersham inside the facing, while I was understitching, to make the waist nice and crisp and stable. The technique for that is in my Pink Polka Dots skirt post. In fact I referred to it, to be sure I was doing it correctly!

I sewed all the seams on the overlocker (I love it!) and then I tested my new concealed zip foot – it’s brilliant. Using Julie’s methods have resulted in another seriously invisible zip. I’m so impressed with myself!

Well, I managed to get all the machine sewing done on the Sunday evening, but the remaining hand-sewing of the facing to the zip, and hemming got postponed to Monday evening.

Facing, with charm

But I was wearing it on Tuesday to work.

I should really be getting on with my curriculum planning…

And how invisible is that invisible zip?!

What would I do differently next time? It’s a really good fit, actually, so I’m thinking that my self-drafted pattern may need a bit of width being shaved off it. On reflection, the Pink Polka Dot skirt made last year from the same pattern is also feeling quite loose. Maybe I’ve lost some weight in the bum & tum area. Next time I use the pattern I’ll measure myself and the pattern and see if I need to tweak it.

What do I love about this skirt? This print attracted me right from the start – I love a monochrome, and the pink just makes it pop!

So that was two down from my deficit of three. I’m going to see if there are a couple more quick wins I can get under my belt this week, to try and catch up with myself. Internet accountability is a powerful motivator!

Pink Polka Dots

I do love this skirt! It’s the product of my Summer Term in sewing class. I drafted the pattern myself, and did a toile, even though my teacher would have let me try without it, but the toile actually did its job, in that it made me alter my pattern slightly.

Pink Polka Dot Skirt

Bonkersly Pink Outfit!

There were three things I learned from making this skirt:

Vent opening in the back seam. I’ve done vents before, they’re an easy thing to do, but I learned, in particular, to add iron-on interfacing to make the vent opening really clean and stable. I’m definitely going to use this technique again.

DSC_0412

Interfacing

Invisible zip – I will treasure Gail’s instruction sheet forever, because it’s the clearest, most straightforward guide to how invisible zips go in that I’ve seen. It inspires me with confidence that I can do this again. I’ll need to get a few more invisible zips into my stash to get more practice in.

Zip close up

Zip close up – the bottom bit is slightly ropey, but at least 3/4 of it is beautiful!


Curved Petersham to support the facing. I’ve done skirt facings before, no problem, but the addition of the curved petersham tape has made it so much more stable. Just to remind myself of the construction order (because I know my memory is fallible), and to help anyone who’s interested in trying it out for themselves:

  1. Sew the facing to the skirt top.
  2. Sew the curved petersham along the top of the facing, on the wrong side of the fabric, with the shorter side of the tape nudged right up close to the seam with the skirt top.
  3. With the skirt seam allowance and the facing seam allowance together, understitch the facing.
  4. Stitch the facing to the skirt at the zip edges, and also at the seams and darts, to stop it flapping about, because flappy facings are a right nuisance.

While I’m feeling very confident that this is a straight skirt pattern I can rely on, I’ve got two more skirts planned that will test this premise, because I’m aware that patterns can sometimes turn out differently.

Tragic Rear View

The Tragic Rear View

The gigantic elephant in the room is how my pattern matching is non-existent. I attempted to get the dots to be approximately in line, but that’s as far as it went. I am forgiving myself for it, because that was never one of my targets for this skirt, it was all about the invisible zip and the vent. So it’s there, and I’ve acknowledged it, but it’s not going to bother me. Much.

But let’s finish on a more positive note – I wanted to keep the skirt as long as I could, so I added bias binding to the bottom to hem it. The only one I had in stash was black, which makes a good contrast, and it’s satin, so it feels lovely and smooth on my legs.

What I love about this skirt?

How learny it was! The construction process really upped my game.

Also it is bonkersly pink! Perfect!


The Counterintuitive Black Bird Skirt

I got this finished on Wednesday. I thought it was going to have to be later, as I couldn’t find my hooks & eyes and I thought I’d have to buy another card of them. But fortunately, I looked again in the totally obvious place for them to be, where I’d already looked before, and bingo, that’s where they were. So this is officially an October make, and I’ll have to get something else made for my November one.

So I now present to you, the Counterintuitive Black Bird Skirt:

The Skirt Front

The Skirt Front


The Skirt Back

The Skirt Back

What I love about this skirt? The birds, of course! But also the little secret pop of lime green hem binding.

Surprise Lime Green

Surprise Lime Green

I did have a slightly senior moment when I panicked that I didn’t have any lime green thread to sew it on, but then slapped my own forehead with a great big “Duh!”, because of course it was black thread I needed, because otherwise the green might show through to the right side of the skirt. I also like that I was making it from stash, albeit stash I haven’t had very long!

What don’t I love so much? My zip is not brilliant- I think I may have mentioned that before? The top of it is a bit off but feh! it’s good enough. Also, I could have planned ahead a bit better, and used the same binding throughout, for design consistency. But I was using what I had available, so I’m not going to feel bad about that either. I’m being very forgiving on myself with this one!

As I said in an earlier post, with this skirt I haven’t done anything new that I’d never tried before. It was intended to be a relatively quick and easy make, which it was. It means I’ve managed to keep to a basic one-garment-per-month schedule, which I’m happy with. It doesn’t sound all that productive, but it’s not a race, and I’ve been making things which have incorporated a fair bit of detailed decoration, that takes time, so I’m satisfied with that level of progress.

The plan is to get going on the tweal dress next. I’m not sure if it’s technically a UFO, since it served its original purpose of being a toile. But given that I always intended it to be a wearable toile, I want to carry on with it. I’ve got a bit more of an idea of what I’m going to be doing with it. Also I think I really need to get this one done before I try and make anything with the leftover teal fabric, just in case I’ve somehow mucked something up.

Tada! The skirt is finished!

In my last post I was explaining that I’d actually got going with this, and now, happily, it’s all finished.

It looks a bit short in the first photo, because I can’t really do perspective when I take pictures. And it’s draped over the side of my bed. And it’s wide, because I’m a big girl. It’s a respectable just below the knee length.

Black denim skirt

Black denim skirt

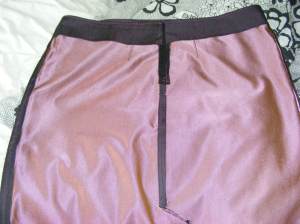
Hem, showing how pretty the pink inside is

Hem, showing how pretty the pink inside is

Inside shot

The obligatory just as neat inside shot

And here it is on

I think I’d better establish from the outset, I’m rubbish at selfies.

Things of note:

1) I did a lapped zip, my first one. I’m not 100% happy with it, but I’m not going to beat myself up over this- it’s the first time I’ve done a zip in years.

2) I did the topstitch sewing in bright pink, for fun.

3) I toyed with the idea of doing fun facings, in a different fabric, but I wanted the top of the skirt to be well-structured, so the denim it was.

4) I was good, and finished all the innards. Denim frays like woah!

5) I used up all the denim, no scraps left, so that’s reduced the stash a bit, and makes me feel better.

My favourite thing about this?

Apart from general pride at making a nice skirt? This skirt is *really* comfortable!