Tag Archive | dresses

Documenting My Neckline – the Not!Barbie dress

I promised that I would be making more of the Reproduction T-shirt dresses, and that I would try to document my neckline process. This is one I made a couple of weeks ago.

The Not!Barbie Dress

The fabric is a soft jersey I bought in France a couple of years ago, on my first visit post-lockdown. I loved the colours, but I never quite got around to making anything with it, because I hadn’t found the right pattern for a t-shirt type dress. Now that I had reproduced my t-shirt pattern, it was all go.

The neckline was very much the default version that I’ve used so far with all these repro tees. I’ve got plans to vary the neckline for the next couple of makes, but haven’t decided which of my many options to go with!

Firstly I measured the neckline on the CUT edge (not the sewing line), because that’s where the fold of the neckband will sit, so that was my measurement for the length of the neckband.

Measuring the edge

I didn’t add any seam allowance to the neckband piece, because the neckband has to stretch a little bit, to sit close to the body, so it needs a bit of tension – not too much, but a bit. I cut a piece of the fabric using that length measurement (56cm, in this case) and 6cms wide (that’s 3cm for the neckband, folded in half and 1.5cm seam allowance each for the front and back).

Next I quartered the neckline. The back length is shorter than the front length, because the neckline is cut lower. So that means the quarter points won’t sit neatly front & back centre, and the two shoulder seams. The quarter points on the sides would be a smidge below the shoulder seam, so I needed to identify where exactly.

To do that, I marked the centres front & back, by folding the dress lengthways, to bring the two shoulder seams together, to mark the furthest points.

Then I brought the two centres together and separated the two sides, and marked their furthest points.

X marks the spot, ie with the dress folded lengthwise, the side quarter points are a bit forward of the shoulder seam
You can’t see the shoulder seams because they’re round at the back
That’s better!

The side quarter marks were sitting about an inch, 2.5cm down from the centre seam. If my neckline had been lower, the quarter marks would also have been lower.

Back to the neckband… I stitched the two short ends together to make a loop, folded it in half lengthways, and pressed it. I should maybe have overlocked or zigzagged the long cut edge, but pfff, I’m lazy, and I know this isn’t going to fray. I marked my quarter points the same way I had for the neckline, using the seam as my centre back point, folding the loop to its furthest extent to mark the centre front. Then I brought the two centres together, extended the sides out and marked their furthest points.

Then all I had to do was match A to A, B to B etc etc. The neckband was pinned to the right side of the neckline. I should have photographed that bit – sorry. I stitched it using a small zigzag stitch on my sewing machine, stretching the neckband a bit, to make sure it fit the neckline. When I’m doing this with a larger loop, eg a waistband, I’d probably put marker pins in between the main quarter points. But I didn’t need to with this small loop. Once the neckline was stitched in place I gave it a quick press and then top-stitched (again with that small zigzag) on the bodice side of the neckband seam, to hold the raw edge down.

You can’t see the topstitching very well, because the pattern is a bit busy, I’m afraid

I’m absolutely delighted with this dress, and it will always be my Not!Barbie dress, because I didn’t make it in order to go see the Barbie movie.

Top, top, dress, skirt… Bank Holiday Makes

Over the years, I’ve bought a fair few basic Primark stretchy tees, because they’re a useful wardrobe staple. I haven’t bought any in the last 5 or 6 years, mainly because I’ve got a largely me-made wardrobe now, and I don’t feel good about buying into fast fashion. I still wear my Primark tees, but I’ve been trying to find a good pattern for a similar close-fitting stretchy tee, so that I can make my own replacements as I need to – the ones I’ve got aren’t going to live forever! It’s not been easy, all the patterns I’ve seen/downloaded needed a lot of adjustment. In the end, I realised the easiest thing was to clone one of my originals. And the weekend before last (May Day Bank Holiday weekend), I gave it a go.

I already had a half tee that I’d cut the bottom off, in order to lengthen another one. So it was an easy job to carefully cut the remaining top half (which is the bit that is hardest to draft) apart and use it to create a pattern. It wasn’t a nice clean job, because I’d worn it hard, and it was quite stretched and warped out of shape. I had to adjust accordingly, but by the end of the Sunday evening, I had a pattern that I could test out. I wasted no time, and on the Bank Holiday Monday, I used some rather nice jersey from Pound Fabrics in a dusty lilac colour and created this first version of my Repro Tee. The jersey is really good quality, nice and firm, with good recovery, so it worked well for this kind of top. I think I’ll be getting more in different colours in due course.

Apologies – all these pictures are “on the hoof” Me Made May Instagram Stories photos, just documenting what I was wearing, so I’m not wearing makeup. I will do better in future…

Snug but definitely wearable

It was more or less as I’d hoped. It was a bit on the small side, but dammit, I’m still going to wear it! Also the sleeve head was a bit tall. Those were two easy adjustments to make.

Fast forward to this weekend, the Coronation Bank Holiday weekend… I spent the Saturday morning watching the Coronation and making the next iteration of the Repro Tee, using the left over pieces of jersey from making this Trapeze dress last summer. Because it was an A-line dress, there were enough biggish bits available to make the front and back pieces, though not big enough to do any clever pattern placement. However, I did remember, this time, that this print does have a direction, and managed to make the leaves sprout upwards rather than downwards, as nature intended.

The Coronation Top

I was now happy with this pattern and started working out what fabrics I’d got in stash that I could use to make more. It’s a quick make. The thing that takes longest is inserting the neckband. Especially as I keep messing them up!

Then I turned my attention to adding a skirt panel to make this top into a dress. The Front and Back pattern pieces are both essentially the same shape once they reach my waist & hips, so I created an add-on piece to make a dress length. I tried it out with this teal jersey I bought in France five years ago. Again I was making the same version of the top, just with longer sides, so it wasn’t any trickier.

I am SO happy with this pattern

This was actually the dress that I’d had in my head right from when I’d first bought the fabric, so this is a definite win.

Finally, the skirt extension that I’d drafted has a slight taper so it’s more of a pencil skirt than a straight one. I still had a metre of the dusty lilac jersey, and rather than make a second top in the same fabric, I decided to use this to make a skirt, so that if I want to, I can wear the top and skirt as a co-ord (hark at me, being all fashionable!). The fact that this is a fairly robust jersey really makes it work for a skirt.

Navy and lilac, the perfect colour pairing!

To be honest, I’m not sure I’ll wear them together, because it’s a bit pastel pale, and I like to have some stronger colour as contrast. But the navy stripy top and skirt from the last couple of posts and the lilac top and skirt are eminently inter-swappable (yes that’s a word), so I’m feeling quite happy about that.

I’ve got so many plans for this pattern, though I don’t imagine I’ll be maintaining this level of productivity. But watch this space!

In search of the perfect t-shirt style dress pattern

I did a workshop at Sewisfaction a while back. I do workshops for a lot of different reasons – sometimes it’s for a thing I particularly want to try making, or a skill that I want to work on with a teacher’s support, sometimes it’s because I want to kick-start my sew-jo, sometimes it’s because I want to give myself some focus time.

This time, I joined because I wanted to make the Beginners’ Jersey Dress. I’ve been trying to find the perfect jersey/ponte t-shirt style dress pattern. I’ve been using my much adapted Simple Sew Shannon dress, but I’m really after a dress with a more set-in sleeve, even if I’m setting it in flat. I was hoping this workshop would give me a pattern that I can reproduce a few more times. I have to say, I’m not quite there with it yet, but I’ve definitely moved a big step forward with it.

The workshop was fun, with people with a wide variety of experience, which Sheona (teaching the workshop) dealt with brilliantly. She organised it so that we all started together with measurements and pattern cutting, then regular demonstrations where we all came together, so even if we had diverged in how far along we were, we all knew what we were doing.

Of course, my dress fell into the upper size range and, having a bigger bust, required an FBA. So I learned how to do an FBA for knits when there’s no existing dart in the dress. Always a useful skill. Having Sheona as a fitting buddy, to spot what could be tweaked and to explain how, was excellent! One of the difficulties I always seem to have had with jersey dress patterns, is that they all seemed to have very gapey necklines, and Sheona was able to show me how I can adapt the pattern without tinkering with the shoulder line, which was working fine. So that’s another useful technique to be aware of.

We didn’t get all the finishing done in the workshop. So I did the top-stitching of the neckband at home, and tried the dress on. I’m not saying I hated it, but it just didn’t feel quite right. It was looser than I liked. I feel that the whole point of a jersey/ponte dress is that it conforms to your body, not that it flaps over it loosely. But that’s OK, because this was always going to be a toile, to see how this pattern worked. I was able to re-sew the sleeve seams to make them narrower , which helped it feel more “me”.

I was wondering what to do about the dress length. I’d cut the dress quite short in the workshop, because that’s how the pattern comes, and I knew this was just a toile. I’ve got some dresses that I prefer short, but this one didn’t feel right for me with so much looseness in the body, and at that length. So I chopped it into a top, and it’s looking a lot more the thing.

Getting there!

So I’ve moved a step further towards my perfect stretch t-shirt dress. I did all the FBA adjustments to the pattern directly, in the workshop, and now I need to reverse engineer it to make the adjustment smaller, to make the dress narrower, more snug.

More on this, as the changes get tried out…

New Dress Alert!

It’s chilly at the moment. And heating is expensive. So warm cosy clothing is what we need right now.

I bought a lovely striped Ponte de Roma from Pound Fabrics before Christmas. It’s an absolute bargain. Only £3.75 per metre but the quality is excellent. It’s good and thick, with the stripe woven in, not printed. I can heartily recommend it. It was just what I needed to make a winter-wearable dress.

The white stripes are 4mm, the navy ones are 11mm

I wanted something plain and simple. I pulled out my trusty Simple Sew Batwing dress pattern. I’ve hacked this one before to give it a slashed boat neckline, with my navy #2 Sew Dots Dress. I thought I’d recreate a stripy version of that. It just means that instead of cutting the dress as a single piece where you fold the dress at the shoulder, I cut it as two pieces, so that I have to sew the shoulder seams. I put a very slight dip into the neckline, but kept it pretty horizontal in the grand scheme of things

I cut out the cuffs that go with the pattern, but I decided against adding them. With the maximum stretch of the fabric running along the length of the sleeve, they aren’t very stretchy around the armhole, and it just didn’t make sense to add a band to them. The sleeves were cut to be 3/4 length, and they’ll be fine without cuffs.

This isn’t my finest make. I didn’t really bother with stripe matching. But I’m not the world’s most critical garment-wearer, and I’ve worn crappier readymade clothing. The key things for me with this dress is that it’s warm, work-appropriate and ready for me to start wearing.

Nothing out of the ordinary, but that’s the way I roll…
Ready to wear tomorrow morning

Easy Peasy Jersey Trapeze-y

Well, you can tell I’ve done no sewing for months, on account of the tumbleweed that’s rolling about here. But this weekend, hip hip hooray, I finally dusted down the sewing machine and the overlocker and made a couple of dresses. I KNOW! TWO! 

I was prompted by the fact that I’m supposed to be going on holiday in a week, and it includes a big family get-together, so I wanted to have something new and summery to wear. It needed to be quick, so that I didn’t lose momentum. So I started with something good and familiar, what I have come to call my Shammon pattern. It’s very loosely based on the Simple Sew Shannon dress/top, but I’ve made so many adaptations to it over the years (mainly a narrower neckline, shorter sleeve shaping, sleeve extension option and no t-shirt neckband) that it scarcely resembles the original.

I wanted to make a sleeveless version of my Stripy Teal Dress. I like the shape of it, and it’s definitely an easy make. I was using a thin and very stretchy jersey that I got in a fabric swap a few years ago. I had 2m of it, and it was perfect. I got the bodice out of 65cms of it, and the skirt front and back used up the rest, as two rectangles consisting of the whole width of the fabric. It was almost zero-waste. This is all that was left.

Almost Zero-Waste

Even if you don’t have the Simple Sew Pattern as your starting point, the basic bodice is dead simple.

I was supposed to add some length to the front bodice piece on account of my full bust, but forgot about it. It didn’t matter because the bodice is drafted to mid hip level (for tops), so it was plenty long enough for me to take length out from the back instead, before adding the skirt. I sewed the shoulders and side seams, then tried it on, to see where my waistline fell, marked it and trimmed it to about 4cm lower than that, as I did want a slight drop-waist.

No need for me to set out all the sewing details, go look at the stripy dress post. It’s basically the same. The only difference is that I left the sleeves off and the bodice is a smidge longer. But like the stripy dress, it’s good and swishy!

Well this came out just how it was in my head, which is always a good thing!
New Dress Number 1, ready for my Summer Hols

By Sunday morning, I’d done everything bar the hemming, and was wondering if I wanted to make another one in the same style, while I was on a roll. I decided against it, for now, and pulled out some other pieces from my jersey stash, for inspiration. I got a blue and white jersey in France last year, and it’s such a big bold graphic print that I knew it needed a really simple shape to make it shine.

The Fabric

I’d originally thought of doing something like a Keilo wrap dress with it, but on reflection had decided that since I have no waist to speak of, that’s a no-no. As I was contemplating, my eyes alighted on a dress I made 3 years ago., hanging up against my wardrobe door. 

This one – an A-line trapeze-y sort of dress

I’d hung it out to see if I could actually get round to fixing the shoulder problem that’s been bothering me since I made it (I still haven’t fixed it yet – I’m not sure it’s actually fixable, but I’ll worry about that later), and I realised there was nothing to stop me making something like that, using my beautiful graphic print jersey, my Shammon pattern and that blue dress as a template. Basically, I used the bodice pattern, from shoulders down to the side notch which is around bust apex level. Then I laid my blue dress (folded in half lengthwise) onto the folded fabric, and marked where the side seam angled out and how the lower hem curved around.

Trapezing the Shammon

(I realised, very much after the cutting process, that the apparently random print does have a direction. There’s a leaf pattern. If I didn’t see it initially, I’m going to assume that most other people won’t see it. And if they do, I’ll tell them that’s the way it was meant to be, like Wisteria cascading down…) 

The sewing was even simpler than the black and white dress, just the shoulders and side seams. Piece of cake!

I left the hemming for both dresses until Monday. I got them all tacked and ready to go on the Sunday evening, so that all I needed to do was load up the double needle and whiz through. I gave them a good press and left it till today to photograph them in daylight.

It’s not a massive Trapezium. But there’s a pleasing A-line summer waftiness to it, and although I’ve made it for the holidays, it’s work appropriate (both MS Teams and face to face!), so it will get lots of wear, not hide at the dark end of the cupboard.

Yay! Two new dresses!

Some Knitting

I’ve been knitting more than sewing over the last few months. When I say “more than sewing”, what I mean is, I’ve done hardly any sewing at all. It’s a combination of factors. Firstly, I don’t really need any more clothes right now. I’ve got a full wardrobe, and with all the working from home and not going places much, I haven’t felt that I’m lacking in appropriate clothing choices of a morning. Secondly, my sewjo pretty much always goes awol in the winter months, so no change there.

But mainly, my niece has just had a baby this very morning, so the last few months have been focussed on knitting snuggly winter baby things for her beautiful boy.

I’m still waiting on buttons to arrive for the blue & white stripy jumper

It’s so nice to knit baby things, they’re so small, and they get finished in no time. I’ve used the smallest size on all the patterns I’ve used, but they’ve all come up in different sizes, so at least mum will have a selection as he gets bigger. I’ve used this Plain & Simple Baby Cardigan pattern as the base for most of the cardigans/jumpers, but I used the Wee Stripes Pullover pattern for the blue & white stripy one, and patterns from Cheval Blanc Laines, that I got in France in the summer.

I’m now in the process of using up my white blue and red yarn, in a tiny colour block cardigan, using a new pattern.

And while I’m on the subject of knitting, I’ve started a major project – a Temperature Dress. For those not in the know, knitters and crocheters have been in the habit of making blankets that record the temperature for each day of the year, by colour. Since I don’t need blankets, but I do like knitting clothing, I decided to try this, but making a dress. I didn’t have a pattern already picked out, so I decided to do what I’ve done on my last couple of jumpers, and that is, work it out for myself, based on my knitting tension and my measurements. I’ve already made a couple of “top-down” raglan jumpers, knitted in the round, and that seemed like a good start. Using one row per day would make it basically a long jumper!

The Temperature Dress so far

I haven’t quite worked out what I’m going to do about the sleeves yet. My initial thought was to keep the dress sleeveless, but since it’s going to be a winter wear dress, it would make more sense to have sleeves on it. I’m not sure of the practicalities of knitting them as I go, but I don’t have to worry about that until mid March, when I get to the end of the raglans, so I’ve got time to work things out!

I decided to use Stylecraft Special DK, because I needed a wide colour range, and I needed this to be an easily washable garment. I decided on double knit, as my yarn weight, because it was going to knit up to the right sort of length for a dress. I think it’s going to end up a bit below knee length.

My rules for determining what the colour is for each day is that it’s the temperature at noon, where I live, unless I’m on holiday, in which case it’s the noon temperature wherever I am on holiday. I’m using this website (Historical weather data for any location | Visual Crossing) to verify my data.

Cool to Warm

I decided on a blue-through-to-purple colour range, and got myself eight different colours. Then I had to decide on what temperature range to apply for each colour. I started by looking at average temperatures for where I live, over the last few years, to get an idea of what the range this year might be. I’ve gone for increments of 4°C, with white being my “anything 0° or lower” colour and the colours going from pale blue (1-4°C), through to lilac and on to a deep berry purple (25°C and over). Since starting, though, I’ve made a mental note that if it looks like it’s going to get REALLY hot, I’ve still got the option to add a deep midnight purple for 25° or more. But I’m not going to buy that yarn unless it starts looking likely that I’ll need it! Plus I’m adding in a strand of silver, on the 1st day of each month and I’ll also add it at the end, on 31st December.

So far it’s going well, but ask me again in March, when the rows are longest!

The rosy pink, or is it ruby red, dress – Part 1

I decided to try another online workshop, a couple of weekends back. This time it was with Sew Different.  It was taught by Tree of Stitchless TV. It was to sew Sew Different’s Everyday Chic dress.

The premise of the workshop was to sew a pattern-hack which would turn it into one of these new Buffet dresses, by making it more gathered below the bust line, and adding an extra flounce. I had bought a length of fabric to do this with, as I didn’t have a stash piece long enough to cope with the gathering and flounces.  It was a floral viscose from Fabricland. But on the day, I realised that although the pattern does go up to large sizes, it was still going to need some alterations. I didn’t want to waste my lovely fabric on a toile that might not be wearable.  I did a quick stash dive, and settled on this cotton which I had bought in France about 3 years ago.

Officially, it’s a khaki/beige colour, not really me at all. But it has a beautiful wrong side, which is a deep ruby red. At least the thread is, but the way it’s woven with the khaki, it’s two-tone and comes across as a rich pearly pink. And just look at that selvedge… There’s no way that was going into the recycling bin – I had to find a use for it somehow.

The change of plan on fabric did mean that the dress in my head stopped being a buffet dress and started becoming one of those loose floofy dresses that I had been eyeing up during Me Made May.  So I wasn’t feeling so bad about that change.

So the first thing, after taking measurements and decision-making, was to make the various alterations to the pattern. I basically needed to add 14cms around the bust.  Tree’s suggestion was to add 2.5cms to the width at the side seam and to add 1 cm on fold. Once that was multiplied by 4 (the two front and two back halves) that gave me my 14cms in total. But… it meant that I had to add 2.5cms to the raglan sleeve pattern piece.

I have to say, I already feel a bit conflicted about raglan sleeves. I’ve been coming to the conclusion that they don’t do me any favours at all.  They always seem to have quite a lot of spare fabric flapping around around the bit between my shoulder joint and my armpit. This just draws attention to my upper chest, making my bust look even bigger than it is.  I’m all for body positivity, and I love my breasts, I think they’re amazing. But generally my aim is to try and balance out my silhouette because I’m top heavy with narrow hips, and it looks a bit weird.

I was also concerned about the size of the sleeve. Even before adding an extra 5 cm to them, the armscye (armhole/sleevehole) was very low, a good 8/9 cm below my actual armpit. Freedom of movement is a good and fine thing, but this was running the risk of turning into Shapeless Sack-ery. With a floppy viscose it might have been ok, but this cotton had structure, it wasn’t so forgiving. But I decided to trust the process, make only the necessary amendments, to see how the basic pattern worked out. It’s just a toile, a hopefully wearable one, but this is why I’d changed fabric.

Because I was making all these alterations to the pattern, I was trailing behind everyone else in getting my fabric cut and prepared. It was starting to be stressy. It was a really hot day, and I hadn’t eaten, because I was trying to catch up on the fabric cutting during the official lunch break.  By the time we started some sewing I was already feeling pressured on time, and still playing catch up. It was starting to turn into an Unfortunate Experience…

As a group we took the decision to sew the bodice first, rather than the skirt.  My own reason for wanting to do this, was that the bodice was the part of the dress that needed the most fitting. The first thing we sewed was the facing for the front of the dress.  I’m not sure mine turned out brilliantly, but it’ll do.  Then it was on to the raglan sleeve seams.  We were leaving the side seams until last, but I pinned my sides together to see how the bodice had come out.  I was pleased to see that the bodice sat quite nicely.  But oh my stars, the sleeves were… humungous. They stuck out like Dumbo’s ears.

Sorry about the light – it’s supposed to be midsummer, but you wouldn’t know it. Also sorry for the grumpy expression!

Too bad, there was nothing I could do to rescue them at this stage. Tree suggested elasticating them. Nah! Not my style. Too Little Girly. And again, it’s just pointing out to the world: Hey look – Béa’s got massive norks! Though to be honest, even without elastication, the sleeves are still broadcasting that message. Tree explained how you could create a dart in the sleevehead of the pattern piece and rotate some of the excess fabric out of the arm that way, but it was too late for any of that with this make, it was already cut out. I hated those sleeves. But I told myself I could find some way to fix them, later.

Tree then moved us on to the remainder of the facing. I don’t know how, but when I tried to add the back facing to the front one, my facings were too short. I had next-to-no seam allowance. I must have stretched the fabric somehow and/or sewn with a wrong seam allowance… Again Tree made some helpful suggestions, sewing the facing pieces by overlapping and zigzagging together, or overlocking them together, but there wasn’t even enough for either of those. So I wasted even more time cutting out a new back facing piece with longer “arms”, so they would actually join up.  I was so behind already and with having to cut this new piece I was even more behind, so I missed pretty much everything that Tree said about how to actually sew the back facing on. I’d have to do that based on my own skill & judgment. More stress…

At that stage I really did feel like throwing the whole bundle into the bottom of the cupboard, never to be spoken of again. I was getting really hot and bothered. The Unfortunate Experience was turning into an Impending Disaster.
I decided to call Time Out on the sewing of the bodice.  If I continued with it, I would be out of time for the rest of the entire dress. Also, I needed to do a load of overlocking for neatness, and I wasn’t set up for it. And it was making me stressed and angry with myself, and I could feel the distinct possibility of bursting into tears in front of everyone.
But then we were going on to the skirt. Trust the process, Béatrice,  trust the process… 

Things went a lot more easily with the skirt.  We created the pockets first and I really enjoyed that technique. It worked, which put me in a better mood. The only thing I worried about was that the pockets themselves were possibly too deep and at some point I’d have to shorten the pocket bags so that I can actually reach the bottom of them.  But until I’d actually sewn the skirt on to the dress and tried it all on, I wouldn’t know how  far down the pockets went.  Once the pockets were done, I was able to get the skirt front and backs gathered, and stitched to the bottom of the bodice front and backs.

At that point, it was officially past the end of the session, and Tree had said she’d stay on a while longer. But I decided that I’d quit while I was ahead(ish), and do the finishing work another day. I promised faithfully to let her know how I finished it.

I still have quite a lot to do. I have a bodice shell, but it still needs overlocking on the raglan seams, and the facing added. I have to decide if I’m going to do anything about fixing the humungous sleeves, and if so, what possible options I have. The waist seam needs to be overlocked, and it turns out that yes indeed the pockets are massively too long, and the bags will need to be shortened. Once I’ve got all of that sorted out, I can sew the side seams and do the hemming. And I want to try and use that selvedge as a hemming decoration somehow or another.

There will be a Part 2, when I’ve worked out how to fix the things that aren’t working for me. I’ve got some ideas, so it’s not all doom & gloom. In fact, trying it on a week after the event, it’s not quite as horrendous as I was remembering, so giving it a bit of distance has already helped. I’m sincerely hoping I can rescue this. I don’t want this dress to hang in my wardrobe unworn, because it has horrible associations for me. Or worse, end up on the WIP pile, never to be heard of again.
(Edited some years later, to confirm there is a Part 2, and it’s here.)

So, see you on the other side!

The Stripy Dress

So, remember I said I was probably done with the Shannon pattern for a while? Turns out I was mistaken!

I had a beautiful stripy jersey in teal, that I’d used before in my Sweatshirt dress.

Imagine this being a much greener/teal-ier colour

I had nearly 2½ metres left over, and I’d been mentally putting that aside for making a Tilly & the Buttons Coco (because I’ve had that pattern for years and still haven’t made it). I took the Coco pattern out, and looked at it, and it looked like it would basically need completely re-drawing, because it’s drafted for a pear-shape, and I’m an upside-down pear. So I put it back in its envelope, and had a re-think for this fabric. I thought about the Shannon, and decided, no, I’ve got enough of those for now.

But then I got an idea of a dress in my head.

Yeah, yeah, yeah, I can’t draw for toffee! Especially legs, it would appear.

And I thought, actually, yes, the Shannon would work for the top of the dress. And the bottom is just basically two rectangles, gathered. So that’s how I played it. I worked out (from one of my other Shannon dresses) where I wanted the waist to sit, and cut the Shannon pattern, as a top, cropped to a little longer than that for the seam allowance. I did my usual sleeve add-ons, but I cut the sleeve tops on the body pieces a bit shorter than the pattern calls for, because I wanted it to look more “dropped shoulder” than “grown on sleeve”. That meant my sleeve add-on pieces needed to be a bit wider at the top.

I added a strip of tape at the shoulder seams, as I knew the skirt would be fairly heavy, and everything would be hanging off those shoulders.

I cut into the two skirt rectangles from the remainder of the fabric and stitched the sides to make a tube. It was quite wide so the gathering at the top was a monumental task.

Next I had to join the top and the skirt. There was a lot of gathering to manage, so took my time over it. First, I didn’t want the stripes to look out & out wrong. So I had to work out how to match them, horizontally. I did a lot of pinning, and then I did two rows of tacking, because I wanted it to be as stable as possible before I did any machining. I added an elastic, again, to support the waist seam, with all the heavy skirting. Finally I stitched it with a suitably stretchy zigzag stitch. I had to redo a couple of sections where the gathering got caught up, but that’s what Nature gave us seam-rippers for.

Seen from the top, looking down towards the skirt

As for the stripe matching? Well, let’s focus on the fact that I started with good intentions. As the French would say, it’s beautiful from afar, but it’s far from beautiful. And as I would say, it’s good enough for jazz.

Finally I had to decide on the hemming. Oh the hemming! Hand stitching or machine? It was a no brainer – this skirt has a LOT of hem! Machine it was, stitching with a tiny zigzag to maintain some stretchiness… And that worked out fine for the skirt and the sleeves. But the neckline was a whole different ballgame. I’d cut it as a slash style neck, shallow so it would sit on my collarbone. But however I pinned it, a normal turn-under-twice hem just looked hideous. I tried with just one turn under (not ideal, but I could overlock it for neatness, which wouldn’t be so bad), and that looked better when I pinned it, so I tried tacking it to see better. But it was still not quite right. It was a bit flappy, not sitting nice and smooth against my throat. What it needed something to pull it in & make it slightly smaller/tighter. Elastic? A neckband? Neither of those solutions were floating my boat, for a range of reasons. Then I had a brainwave. I could use some plain white jersey (I’ve got plenty of it in my stash), to create an internal bias binding finish, and use that to gently tighten the neck hem a smidge, and get it sitting just right. So that’s what I did.

And voila! I reckon it’s pretty close to the original picture in my head.

It feels slightly “Hallo Sailor”, but I’m choosing to see that as a good thing.

I really love it! And it’s making me think that I need a bit more Nautique in my wardrobe. Maybe some t-shirts for the summer.

A May Make

I did some sewing at the weekend. It’s been a while. But I fancied making something out of some fabric that I impulsively bought a few months ago.

I’m a big fan of black & white – well, this is more ivory than white, but I’m down with that too. I really love the random splotchiness of the pattern. I got it from Pound Fabrics, but I can’t see it on their website now. It’s a double knit of some kind. It’s got two layers, lightly attached to each other, so it’s quite warm. The wrong side is plain black. It has a small amount of stretch across the width of the fabric.

I reached for my Simple Sew Shannon pattern – its simple lines are great for showcasing a fabric like this. By now my Shannon has morphed quite considerably from the original design. I’ve ditched the neck and sleeve bands, because they make a dress look t-shirt-y, whereas I usually want my dresses to look a smidge more formal. I often lengthen the dress, although I do have some short versions. I added 18cm to this one. I also narrow the skirt a bit – the original pattern is quite A-line, and that uses more fabric, but also I like the straighter silhouette. I narrow the neckline a bit, because even with the neckband, it’s wider than I like, and it would show my bra straps. In this one, I took the neckline in by 1cm each side. Finally, I added a sleeve piece, so that I can make dresses and tops that are more wearable in cool weather. I’ve usually kept the sleeves to 3/4 length, because I don’t like sleeves flapping around my wrists, I inevitably push long sleeves up my arm.

I think that’s it for Shannons, for a while at least (famous last words!). Me Made May has provided some inspiration for other styles of dress that I fancy trying out, and other patterns to try out (more on that when I do my MMM learning roundup). However, I’ve still got 2.45m of this fabric left over, so you’ll be seeing more of it, one way or another.

Me Made May continues apace. I’ve worn me-mades every day, I’ve posted my outfit every day so far on Instagram, I’ve commented on lots of people’s #MeMadeMay2021 posts, and #MeMadeMayPlus posts, as well as liking hundreds more.

Online sewing

As the weather warms up, as the sun brightens our days, as the evenings stay light for longer, my creativity is waking up. I did my usual thing to kick-start my sewing, and booked myself on a course. Naturally, it wasn’t a face to face course, we’re not out of the lockdown just yet! But I didn’t know how a Zoom course would work, so I thought I should at least try one.

Claire Tyler has a wide selection of Online Sewalongs. I picked the Nina Lee Mayfair Dress course. This pattern is right in my wheelhouse. It’s designed for jerseys, so it’s comfortable, and it looks smart so it will work for when I have to go back to the office (one day…). And it’s got an interesting neckline, so it works for all those Teams meetings while I’m still working from home. It’s got a stand up collar, grown on to the front, with loose pleats, that give you the fullness for the bust, without darts.

Mayfair-Dress-nina lee site

Image from Nina Lee Patterns website

At the start of our Zoom, we had a bit of social chit-chat, much as you would in any face to face course. There were six of us, and the others had all done quite a few of Claire’s courses, both in person and online. We turned to discussions of which version of the dress we were planning, and what fabric we were using.

I was using a fairly recent purchase, a viscose jersey from the Textile Centre – we all know what I’m like with a floral print! It’s light-weight, with a beautiful drape, and it has 4% elastane, giving it really good stretch recovery.

wp-1617293256642.jpg

Pretty but a little bit edgy, maybe?

I was going for the knee length dress with the 3/4 sleeves, basically the blue one in the image above. I don’t like having fabric flapping around my wrists! I was seeing this as more of a transitional Spring/Autumn dress. Some of the others, including Claire, were making the maxi version with short sleeves, as a billowy Summer dress.

One thing that some of the others were doing was adding in-seam pockets. I’m one of those weird sewers who doesn’t actually care one way or the other about pockets, so I wasn’t planning on adding any this time around, but I did pay attention to what those others were doing at the time, so if I decide to go ahead with pockets on a new version of this dress, or indeed any other dress, I’ll know how to go about it.

The first thing we did was check our own measurements against the finished garment measurements, to make sure we were cutting the right size, and to see what adjustments we would need to make. The great thing I discovered when I was buying the pattern was that Nina has expanded the size range for her patterns up to a size 28! Hooray for not having to do a massive grading exercise! I thought I’d have to do some kind of FBA, but when I measured up the pattern pieces, and compared them to my own measurements, it was all looking fine, no FBA needed. As it turned out, the main adjustment I needed was to lengthen the bodice of the dress, by a massive 15cms, to cover my expanse of bosom. That was straightforward enough. Claire checked in with everyone to make sure they were clear about what their adjustments were, and made sure we knew what we were doing. Then it was a matter of cutting it out, and marking it up. That always seems to be the longest part of any sewing project.

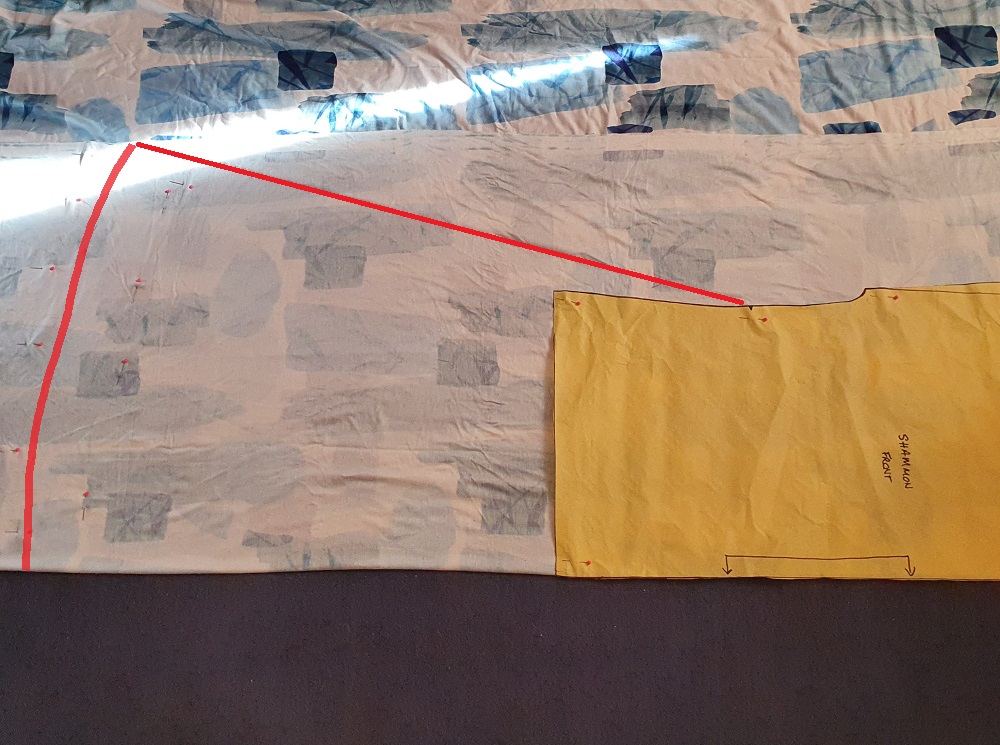
The cutting out revealed something I hadn’t realised. I had assumed I had 3m of my fabric, because that’s what I’d ordered, when I bought it. But it turned out I actually had 3 yards, i.e. 2m75. That would have been enough, if I hadn’t had to add the extra length to the bodice. I was wondering if I’d have to go for the short sleeves (as per the pink version above), but I decided I could get away with cutting the waistband tie pieces on the cross-grain, using the bits left over from cutting the front, back and sleeves. This wouldn’t have worked if the fabric was much less stretchy along the grain that across it. Fortunately there was a reasonable 4-way stretch, so I could keep those mid-length sleeves. I’m a bit annoyed with the Textile Centre, but I should have measured the fabric as soon as I received it, and raised it with them at the time, so it’s my own stupid fault. And there was a workaround, so it was ok in the end.

We got started with the collar, which is probably the trickiest bit of the whole dress. And as I said, it’s a nice feature. We had to create pleats, and then do one of those seams where you have the shoulders joining straight onto the collar, which involves some tight pivoting on the intersection between shoulder & then we had to sew the collar facing to that seam. Nina’s instructions use the burrito method, but there’s quite a lot of fabric to try and roll into it, especially for the ladies doing long dresses. So Claire suggested either a straightforward stitch-in-the-ditch join, or just hand-stitching the facing down. I love a bit of hand stitching so that’s what I opted for. We finished the session with the centre front seam, and that was it for day 1.

Day 2 had us working on the gathered front. The instructions that come with the pattern say to use an elastic to create the gathers t, or to gather in the traditional way with thread. One person had already tried the elastic method, and she’d found it a bit fiddly, but also she pointed out that the elastic would be straight against her skin, so she was planning on unpicking that and doing a traditional gather. I think once she’d mentioned that, most of us decided to go with a thread gather. Then we created the belt, and attached it over the gathers. The last major jobs were then to attach the sleeves (flat), sew the side seams and do all the hemming. Claire was demonstrating how you could use a coverstitch machine to do the hemming, but I was going for a basic twin-needle hem. Claire had some really useful hints for working with twin-needles, to avoid “tunnelling”, including using a specifically stretch twin-needle, lengthening the stitch a bit, and the big lightbulb moment for me, loosening the tension on the foot (using the little wheel at the back of the machine). It worked an absolute treat! Nice flat twin-needling.

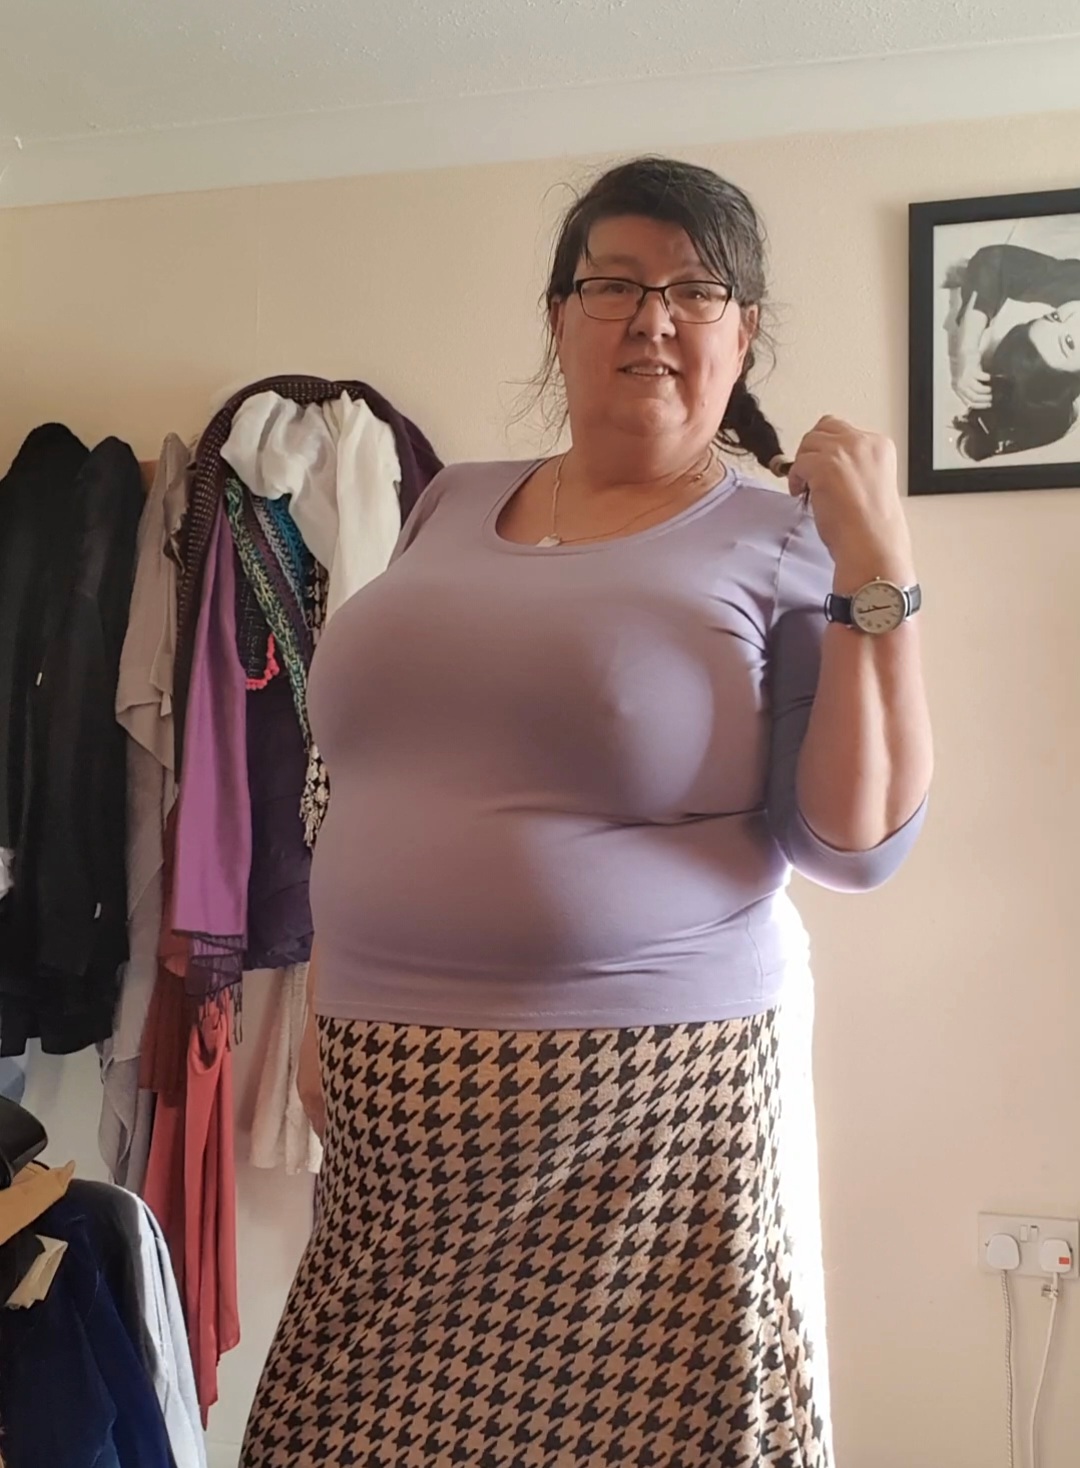
And here’s the finished article… 

wp-1617292949960.jpg

wp-1617292712085.jpg

I love the neckline, the soft pleats are so gentle and flattering, and the collar stands up which lengthens the V for those of us with short necks.

I’m now treating this version of the dress as a wearable toile, and I’m planning to make another. I’ve got my major alterations done, and now I can fine-tune the details. I want to tweak the length of the shoulder seams, as the shoulders are a bit dropped on this version. Claire has shown me how to do that, and I think I can stand to lose 3 or 4 centimetres there. And if I’m shortening the shoulder seams, it will mean the sleeves shift up, so I will probably have to lengthen the sleeve pattern. I’d also narrow the sleeves a bit, as I like them a bit more close-fitting. 

I always love the social element of doing courses, and I feel like this was a reasonable substitute for being in the same room with other people, given that we have no other choice. It kept me focussed and “on target”. It’s nice to see other people’s sewing spaces. – some of them had beautiful sewing rooms! I don’t have a lovely sewing room, with cutting table, and shelves full of stash. I have to do my pattern adjustments and my cutting out sitting on the floor, and my sewing machine is in a different corner of the room than my desk and laptop, so all that people would have seen of me is my wall most of the time! I was perfectly able to ask questions when I needed to, but once I got working, it didn’t really feel like I was working “with” everyone else in quite the same way as you do when you’re all together. Hopefully we’ll be back to that soon – I’ve got a Sewisfaction Swimming Costume workshop that’s been booked since January 2020, and keeps having to be reorganised, so I hope it will be sooner rather than later. But in the meantime, thank heavens for Zoom, and the internet, for giving us the next best thing.

wp-1617292968235.jpg